
|
I have finally had a moment to sit down and do this so lets get to it and see those low scoots.===============================================================First off lets make a parts list.
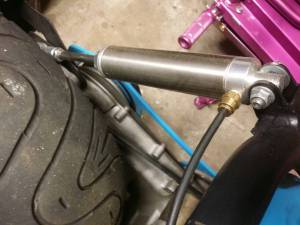
===============================================================http://www.mcmaster.com/#standard-air-cylinders/=wndpbbYou will need a Cylinder of course which will be your biggest thing. The website has a search function so type in the SKU# 6498k545 Round Body Air Cylinder Single-Acting, Push Style, 1-1/2″ Bore Size, 3″ Stroke ( Which fully ended is a 9.32″ Shock Similar Length To NCY Low Boy Shock) I am 150 pounds and this holds me up fine. Of course I’m making this how to with that so if you choose something else best of luck to you. The End Rod Rod End for 1-1/2″ Bore Round Body Air Cylinder Check Vavle so that air only goes into the cylinder and doesn’t allow it to back into the pump. Medium-Pressure Brass Check Valve My order total with shipping was $97.36 =============================================================== Air Pump Now I used at first the Slime tire compressor. Worked for a few weeks. Then it slowly began not being able to pump the cylinder. I went the cheap route and got what I paid for. Don’t go cheap or you be stranded somewhere pissed off your bike won’t rise. Luckily I was home when finding this out. So get something thats quality and pumps continuously. Viair 95 Compressor Kit $89.93 + Free Shipping http://www.amazon.com/VIAIR-Viair-95C-V … 944&sr=8-1 =============================================================== Electronic Dump Valve ( This is so when you hit your release switch it will dump the air. Now you can get a manual release valve and note wire this up for a switch but that’s no fun now is it ) DC 12V 1/4 Inch Electric Solenoid Valve for Air Water / High Quality Replacement Brass Valve for Use with Pipelines in Water, Air and Diesel Applications http://www.amazon.com/Electric-Solenoid … noid+valve =============================================================== I’m not telling you what switches to buy or which to buy or how to wire. If you can’t manage that then you should stop here. =============================================================== You will finally of course needs some nuts,bolts, and spacers but I’m not putting what I used because it was ones I had laying around and you can use w.e preference you want. Just don’t use dollar general and wonder why they broke. =============================================================== You will also need a some medal to make you a eye to eye shock mount bracket. You can always pay someone to make one but still I’ll show you mine in general and how I made it atleast.
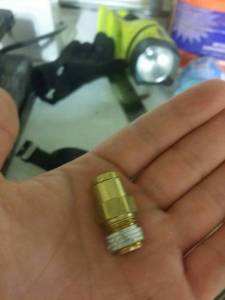
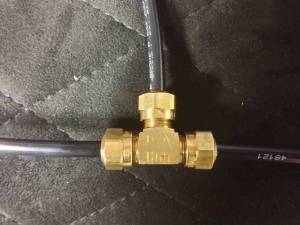
=============================================================== Now for fittings and air hose, we are using 1/4″ brass air fittings. I went to my local NAPA and picked these up in hand and honestly I suggest you do the same and get quality ones. ( lets not forget the suspension is your life don’t be a cheap ass ) This is what you are looking for. You need 1 of these.
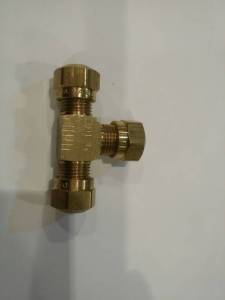
1 of these which is your T which breaks air from the pump into the dump valve and your cylinder. **WARNING* The T has little air line fitting that once used can’t be used again. Now you can replace them but I suggest you stick hoses in all other parts then run them to the T and cut and tighten. This T isn’t a quick release like all other fittings NAPA had. If they have a quick release T then I’d suggest that incase you ever need to take off the line for some reason.
Now the fittings for the solenoid dump valve and check valve are bigger in size but fit the same size air line. So you will need 3 of those fittings which look like the ones above just slightly bigger. 1 for the dump valve and 2 for each end of the check valve. Now the dump valve has a straight open end so when dumping air it will go fast. A suggestion is to get another fitting. Put it on the dump end and put a 1 inch line of hose or something to slow down the air release pressure so it doesn’t just drop in 1 second. But you will find out on your own which you prefer. =============================================================== So in this order you should do things. Let’s work on a shock mount or else it won’t mock up.
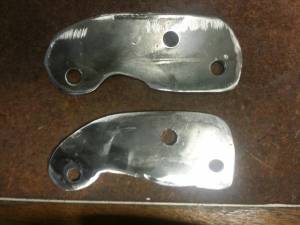
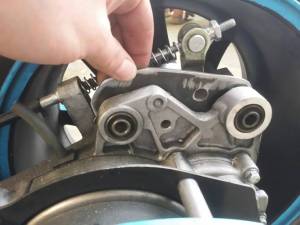
Look on the inside side of your shock mounts between the tire and mounts and you will see why a simple straight bar won’t work. Need this small hump so it fits right and I just grind down the rest and smoothed it out to paint.
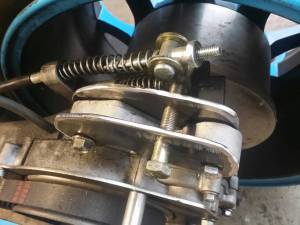
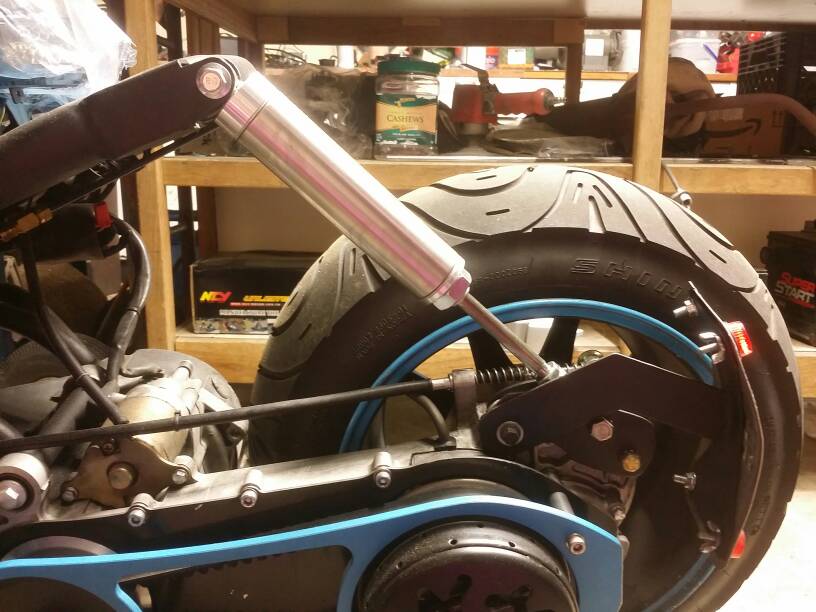
You will need some washers on each side of the cylinders end rod to keep it secure from moving around on the bolt going through.
Now I filled this open more to use the bolt and nut that actually fits in the top shock bracket on the Maddog. That way I knew it was secure. Depending on your bracket (being Chinese no 2 are the same likely) I grinder down my round edges some so that it wouldn’t hit my cylinder when rotating.
I also used spacers to keep it secure since it’s a little thinner than the mount is. Just use common sense. You don’t want the parts flapping around not secure so keep safety in mind and you will be fine. Should look like this when done.
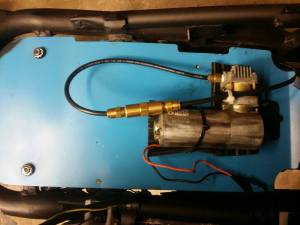
=============================================================== Now your pump. I put mine under the seat. I placed rubber underneath it and tie strapped it down. Drilled 4 holes in the place and put them through the plate back up top and tied it down. It’s as secure as you tighten it.
Get you some air line and plug your check valve up to your pump. The valve will have an arrow on it letting you know which way air passes. So do that to w.e length you want and wherever you put it. Don’t cut unless you know for sure that’s the length you want. And the item is secure where it will be. =============================================================== The dump valve. I honestly forgot to take photos but mine is under my seat pan. Just take my word for it. Of course put your fittings in etc. This does the same. Shows which was is out. It’s a one way so only opens one way.
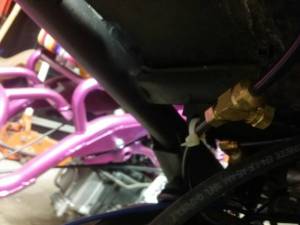
=============================================================== The T I have mine strapped up under the seat pan towards the back to some bracket that’s on our bikes.
This piece is a little tricky remember so make sure you run all your lines from the pieces then once they get to the T you can cut and plug them in and tie this up to hide.
=============================================================== Now that should be about it. Really simple honestly now that I have done it. Mostly everything is just plug and play. Now you still need to wire up some switches or buttons or whatever it is you prefer. Then try it out. If it doesn’t pump make sure your check valve arrow is pointing towards the cylinder meaning it’s letting air go towards the cylinder. You should have everything in this order. Pump. Check valve. T. Once you get to the T it doesn’t matter which end you put where so no worries. If you have questions feel free to ask but post a question in the group page so other members can see your question and receive the answer. Don’t PM me please. Just for everyone’s benefit. For the record with my exhaust on I have about 1.5 inches of ground clearance so the bike doesn’t actually sit on the ground but from the bake eye it sure looks like it. Then again also depending where you drill your holes for the end rod bolt will give you more or less clearance. I’ve rod slammed down at our lake front and it’s beat being so low. When pumped up the ride is also very very nice. =============================================================== Enjoy.
|